Showing posts with label How to. Show all posts

How to install Budgie Desktop on Antergos 17.3

The good thing when using Linux is that we can easily install another desktop environment alongside the existing one. On this tutorial, I am going to show you how to install Budgie Desktop on Antergos Linux 17.3. I was using Antergos 17.3 with GNOME desktop and I want to install Budgie Desktop. The latest Budgie Desktop 10.2.9 is currently available on Pacman repository.

Steps to install Budgie Desktop on Antergos 17.3

The following are the steps to get Budgie Desktop on Antergos
  1. Open Pacman (Add/Remove Software)
  2. Type budgie on the search box
  3. Mark Budgie Desktop for installation
  4. Apply and wait until the download process is completed
  5. Log out and log in to the new Budgie Desktop

Select Budgie Desktop from the list


Thank you for reading this post and don't forget to share this article if you think its useful. Cheers

Install Spotify on Antergos 17.3

Now I am upgrading my Antergos to version 17.3. And here I want to guide you to install the Spotify on Antergos 17.3. Spotify is my favorite music player on any computers and devices I use.

spotify on antergos

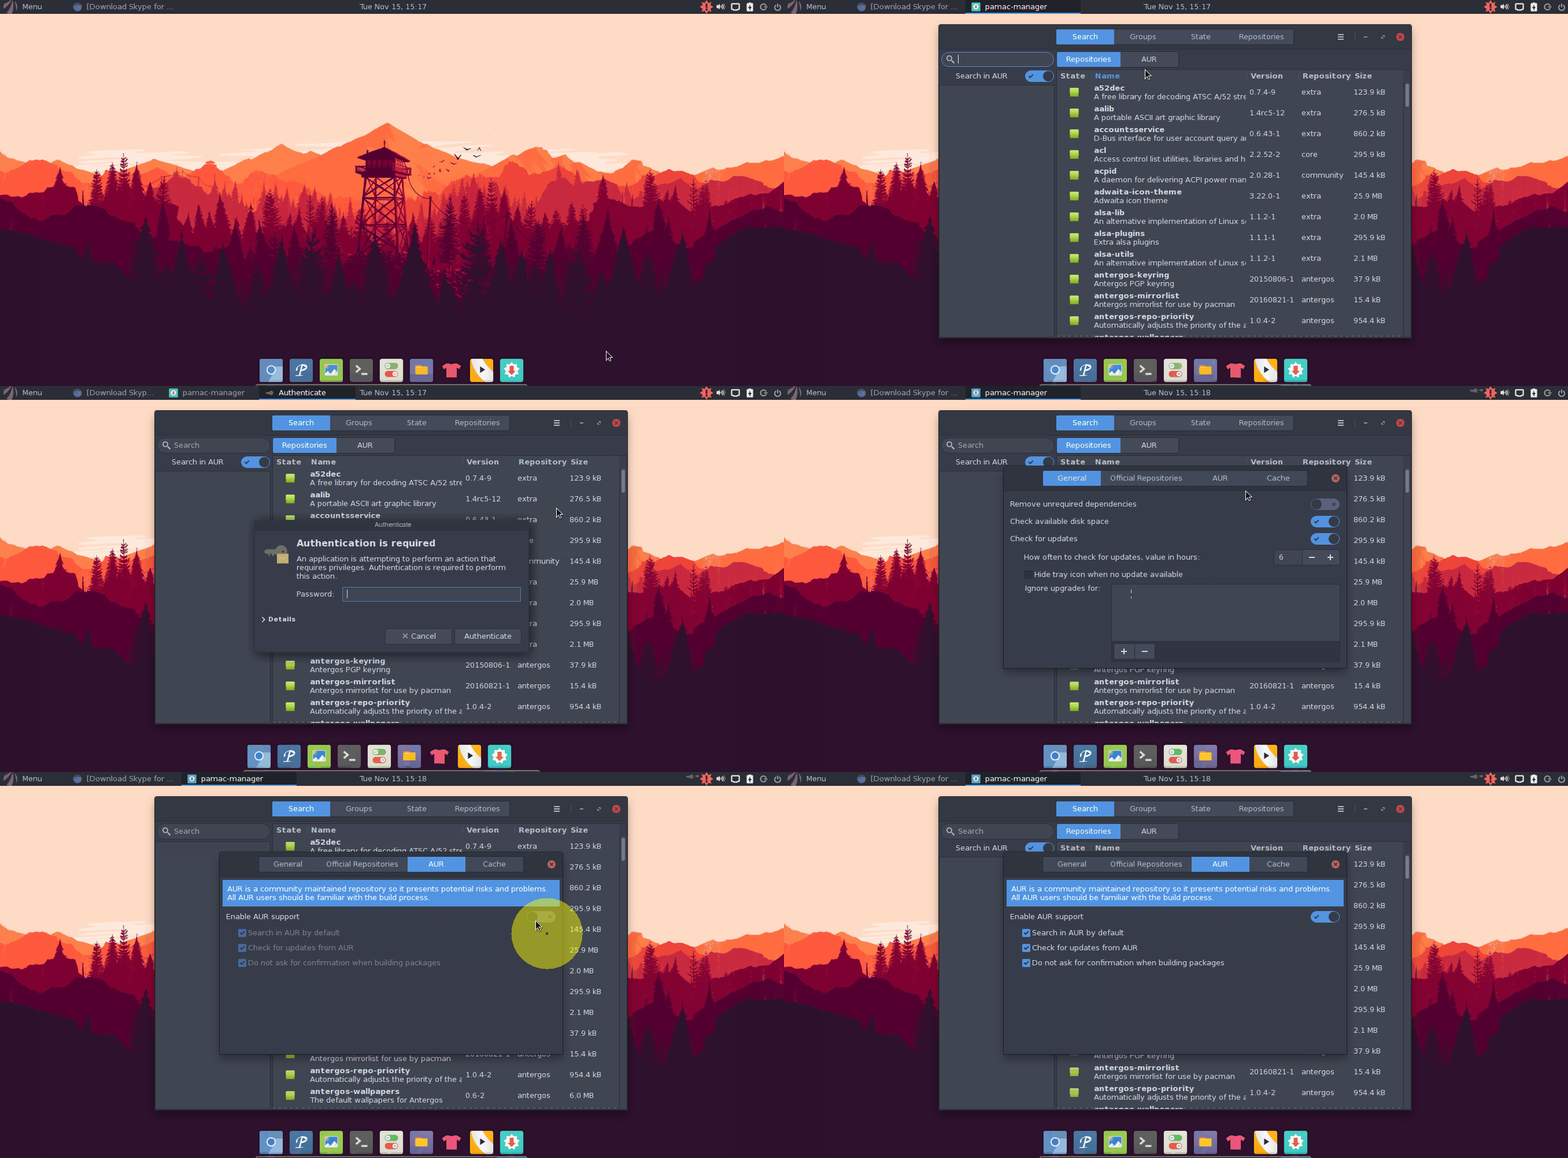
Spotify is available through AUR repository so first thing first is to enable AUR on Antergos. You can read my tutorial to enable AUR on Antergos from this link. The following animated image shows how to easily install Spotify on Antergos 17.3.

install spotify on antergos

I think that's pretty straight forward and clear. But if you still have any question, please leave us comments. Share this post if you think it useful. Cheers.

How to configure static IP Address on Antergos Linux

Even most Linux distribution supports automatic (DHCP) IP configuration, I think it is important for all Linux users to understand how to configure the IP address manually. On this tutorial, I am going to show you how to configure static IP address on Antergos Linux. There are two ways to configure static IP address on Antergos. The GUI mode (easy way) or via command line (needs more patient). But here, I will explain both of them.

Configure Static IP address using GUI mode

Open Network Manager via Settings. The following illustration will explain much better than my words. In this scenario, I am using 10.34.0.76 as my new static IP address, 10.34.0.5 as gateway and DNS server on the network. This configuration could be different based on your network configuration.
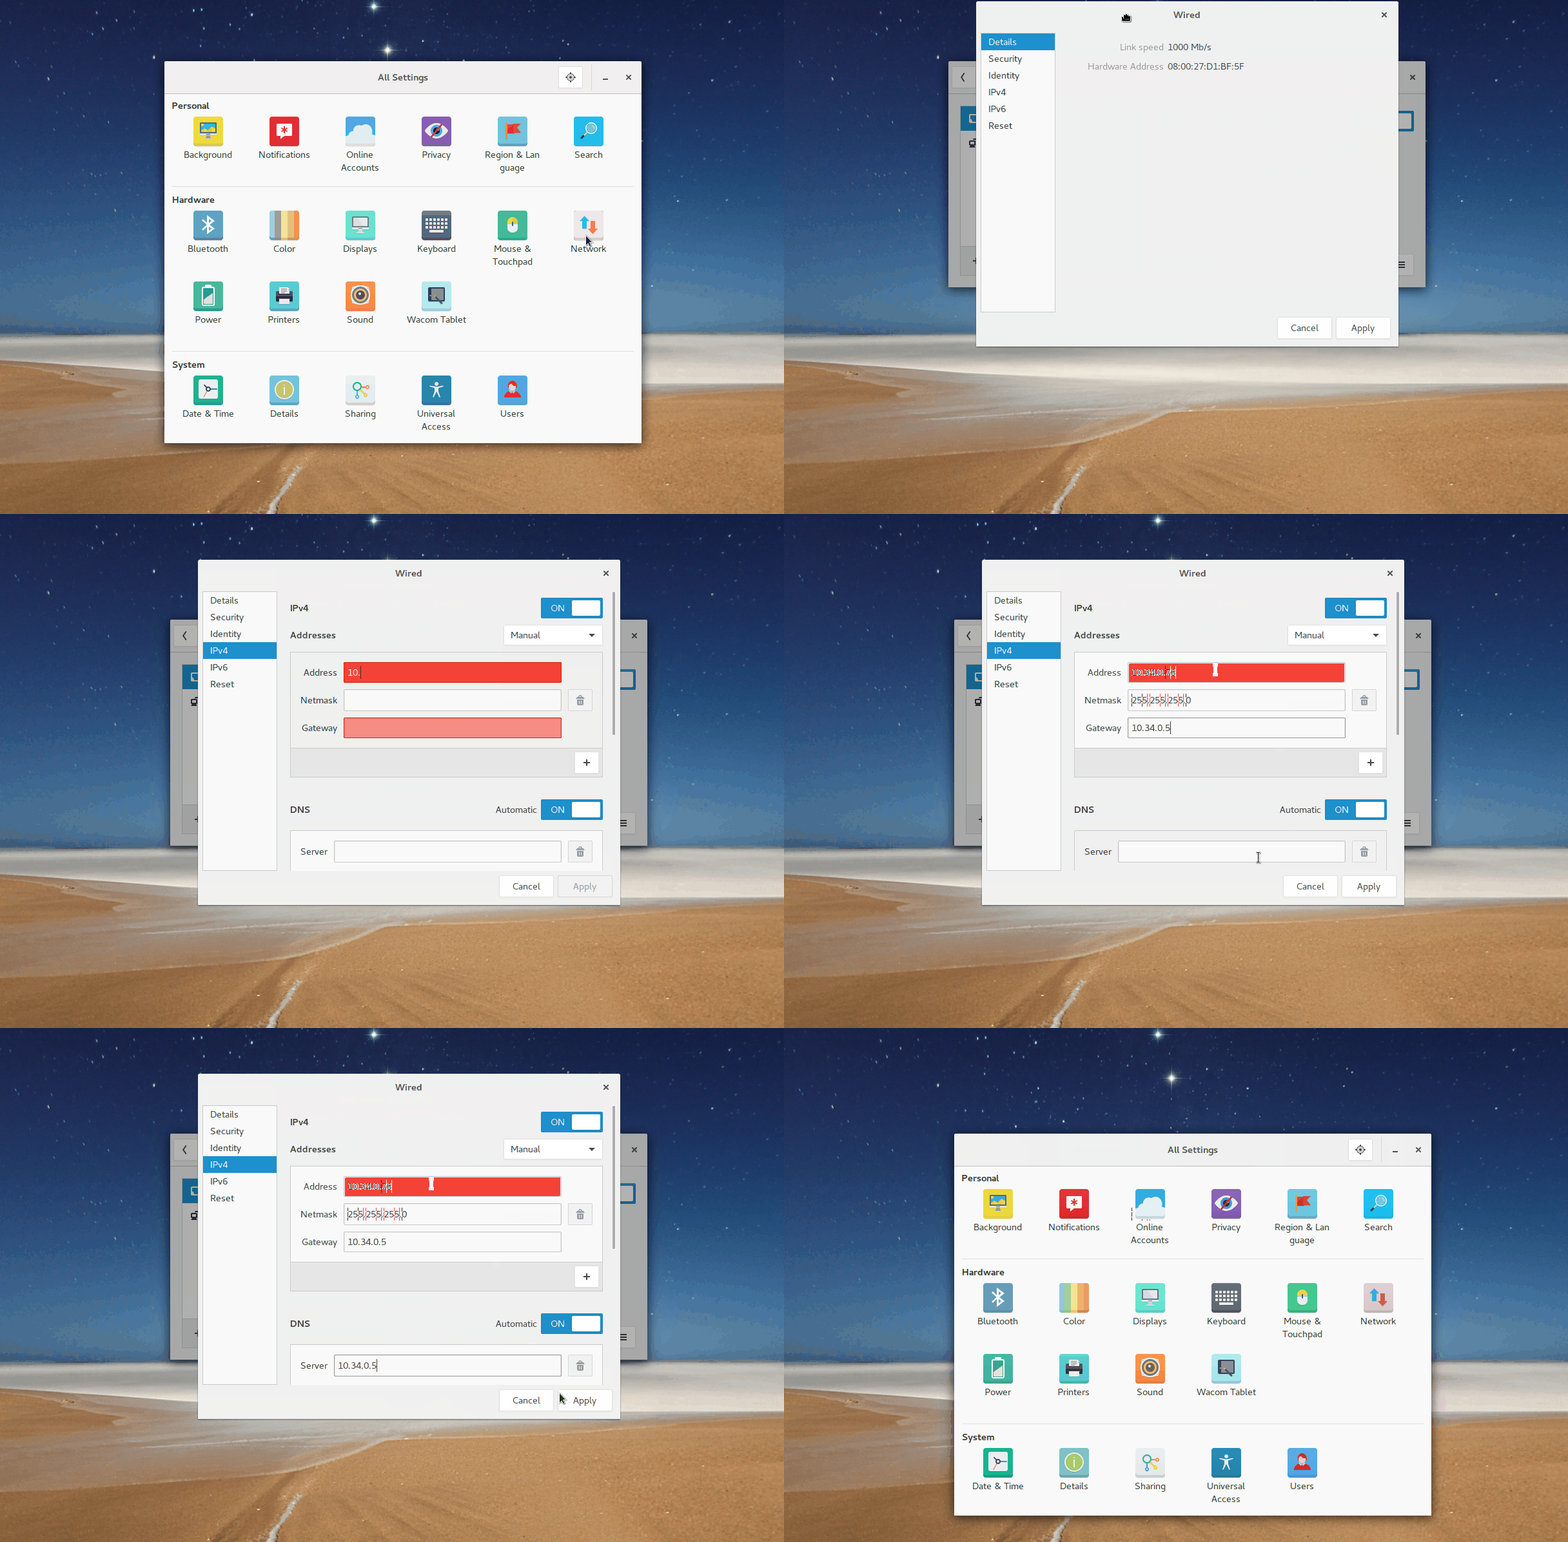
configure static ip address on antergos

Configure Static IP address via command line

Ok, first thing first we need to open Terminal console and type the following command to see the detailed information about our network device.

ip addr

Output:

[dhani@antergos ~]$ ip addr
1: lo: <LOOPBACK,UP,LOWER_UP> mtu 65536 qdisc noqueue state UNKNOWN group default qlen 1000
    link/loopback 00:00:00:00:00:00 brd 00:00:00:00:00:00
    inet 127.0.0.1/8 scope host lo
       valid_lft forever preferred_lft forever
    inet6 ::1/128 scope host
       valid_lft forever preferred_lft forever
2: enp0s3: <BROADCAST,MULTICAST,UP,LOWER_UP> mtu 1500 qdisc fq_codel state UP group default qlen 1000
    link/ether 08:00:27:d1:bf:5f brd ff:ff:ff:ff:ff:ff
    inet 10.34.0.76/24 brd 10.34.0.255 scope global enp0s3
       valid_lft forever preferred_lft forever
    inet6 fe80::4c7:5669:326a:12d5/64 scope link
       valid_lft forever preferred_lft forever

As you can see, there are two network shown by the command. lo and enp0s3. This network interface can be different on your system. I will only need to care about the enp0s3 device. Leave the lo as is.

Copy the sample static ethernet profile to profile directory with this command

sudo cp /etc/netctl/examples/ethernet-static /etc/netctl/enp0s3

Now edit the new profile

sudo nano /etc/netctl/enp0s3

Now change it to something like this below:

Description='A basic static ethernet connection'
Interface=enp0s3
Connection=ethernet
IP=static
Address=('10.34.0.55/24')
Gateway=('10.34.0.5')
DNS=('10.34.0.5' '8.8.8.8' '8.8.4.4')

Change the interface, address, gateway and DNS to match your current local network configuration. Once completed, save and exit.

Now start the profile manually

sudo netctl start enp0s3

Now enable it upon boot

sudo netctl enable enp0s3

Done.

How to enable SSH server on Antergos Linux

This short tutorial will show you how to install or enable SSH on Antergos Linux. By enabling the SSH on Antergos, we can remotely control Antergos from other computer in the same network or even from the internet. All we need is to install openssh package and some little tweak. OK let's get started.

Install openssh on Antergos

sudo pacman -S openssh

install openssh antergos

Once installed, we need to start the service

sudo systemctl start sshd

Also, we can set the ssh server on boot

sudo systemctl enable sshd

Now you can remotely login to Antergos via ssh with your normal user. For example:

ssh dhani@10.34.0.10

Change dhani with your actual user and change 10.34.0.10 with the Antergos IP address.

How to install Google Chrome 56 on Antergos 17.2

This tutorial is going to show you how to install Google Chrome on Antergos. The new Google Chrome 56 is now available for Linux system and I am using the latest Antergos 17.2. Installing Google Chrome is very easy.

Steps to install Google Chrome on Antergos


  1. Enable AUR repository
  2. Install Google Chrome

Step 1. Enable AUR Repository

Google Chrome package is available in AUR repository. You will need to enable AUR repository first prior to Google Chrome installation. Please read my previous tutorial to enable AUR on Antergos Linux.

Step 2. Install Google Chrome

We can install Google Chrome via Terminal command and via Software Manager as well. If you prefer command line, the following command is used:
yaourt -S google-chrome
Once completed, you should see the Google Chrome icon listed in Applications.

How to install Budgie Desktop on Antergos Linux

I am running Antergos 2016 with Gnome desktop on my Virtualbox. And today is a big day for me because I want to install another interesting Desktop environment, Bundgie. The new version of Budgie Desktop is available and its a good time to give it a try.

Steps to install Budgie Desktop on Antergos

Most of the steps taken here are done via Terminal commands.
Step 1. Update and upgrade Antergos
sudo pacman -Syu
Step 2. Reboot
sudo reboot
Step 3. Install Xorg Server
sudo pacman -S xorg xorg-server
Step 4. Install Budgie Desktop
sudo pacman -S budgie-desktop

Step 5. Install Display Manager
If you don't have any display manager installed, you must install it as well. There are several Display Manager we can use. 
  • GDM — GNOME display manager.
  • LightDM — Cross-desktop display manager, can use various front-ends written in any toolkit.
  • LXDM — LXDE display manager. Can be used independent of the LXDE desktop environment.
  • MDM — MDM display manager, used in Linux Mint, a fork of GDM 2.
  • SDDM — QML-based display manager and successor to KDE4’s kdm; recommended for Plasma 5 and LXQt.
  • XDM — X display manager with support for XDMCP, host chooser.

For example, I want to use Lxdm as my display manager.
sudo pacman -S lxdm
When complete, log out and login to the new Budgie desktop.


Install Spotify on Antergos 2016

This tutorial will show you how to install Spotify on Antergos 2016. Spotify is the most popular music streaming service. Spotify is available in AUR repository. Antergos, Manjaro, Arch Linux user can easily install Spotify through Pamac software manager. But first, make sure you enable AUR Repository on Antergos.

spotify on antergos

Steps to install Spotify on Antergos Linux

Step 1. Open Pamac software manager

Step 2. Type "spotify" without quotes on the search box

Step 3. Mark Spotify on the search result and press Apply to start the installation

spotify on antergos 2016

Once complete you can start listen your favorite music on Spotify.

Yarock, a modern music player - see how to install on Antergos

Yarock is another cool music player for Linux. The new version of Yarock 1.16 is now available for download and here I will show you how to install it on Antergos Linux. It support local music collection and also online radio station. Yarock will automatically search and download cover art and album art of your music collections.

yarock on antergos

How to install Yarock on Antergos 2016

Yarock is available on AUR repository. Make sure you have enabled AUR repository on Antergos. Now execute this command on Terminal

yaourt -S yarock-qt5

Example

install yarock antergos

You can also attempt to install Yarock via Pamac software manager.

Install Team Viewer 12.0 on Antergos 2016

I am a system administrator who manage many computers and also provide supports to our staffs when they have problems with their computers. We are running 2 offices and one field office in our gold exploration project. Team Viewer has been my best friend for the last few years. I can connect to a computers in other office from my desk, provide help and support to the staffs using Team Viewer.

Our company uses Microsoft Windows for most of the PC and Laptops but we manage a Linux Server as the data storage. I use Linux for my daily use and Team Viewer is always on my list of running program all day long. Today I want to share with you about how to install the latest Team Viewer 12.0 on Antergos Linux. Installing Team Viewer on Antergos is way easier compared to installing Team Viewer on other non Arch based Linux. Thanks to AUR repository who provide the Team Viewer package for Arc Linux and derivatives.

Steps to install Team Viewer 12.0 on Antergos 2016

Step 1. Enable AUR Repository

There are many many software or packages distributed through AUR repository. I highly recommend you to enable AUR repository on Antergos. To enable AUR repository, please read my previous tutorial: http://antergos-tutorial.blogspot.com/2016/11/how-to-enable-aur-repository-on.html

Step 2. Install Team Viewer

You may choose the best way for you to install Team Viewer.

Via Terminal Command

yaourt -S teamviewer

team viewer antergos

After install we need to run the daemon

teamviewer -daemon start

team viewer daemon

Now run Team Viewer

teamviewer antergos

How to install Skype 4.3 on Antergos 2016

Antergos Tutorial is going to show you how to install Skype 4.3 on Antergos 2016. Skype is a popular VoIP (Voice over Internet Protocols) application. We can make free phone calls, chat and video calls to other people wherever you are. 


Steps to install Skype on Antergos 2016


Alternatively, you can use the following command in Terminal console
yaourt -S skype
Make sure AUR repository is enabled before you execute the command above.

Make your Antergos GNOME more eye catching with Arc Icon Theme

I am currently running the latest Antergos 2016 Linux desktop with GNOME. Its a pretty Linux distribution by default. But for me, it still need a little tweak to make it more eye catching. Antergos uses Numix Icon Theme as the default Icon. Numix is fine, but for me Arc Icon Theme is way better. It combines Arc with Moka Icon Theme and as a result, my Antergos now become even more beautiful.

Default Antergos 2016 Desktop with Numix Icon Theme

antergos default

antergos default 2

Antergos 2016 with Arc Icon Theme

antergos arc 2

antergos arc 1

Install Arc Icon Theme on Antergos

yaourt -S arc-icon-theme moka-icon-theme

How to enable AUR Repository on Antergos 2016

Antergos Tutorial - Here I will show you how to enable AUR Repository on Antergos 2016. AUR is a community maintained repository for Arch based Linux. Many applications and packages are built, maintained in this repository. AUR is not enabled by default on Antergos installation. So, we need to do it manually. 

Steps to enable AUR repository on Antergos 2016

Open Pamac Manager (Add/Remove Software) and then click the three strips button on the top right. Select Preference. 
Click AUR tab and then enable AUR support. Done. Now AUR is enabled on Antergos 2016. Its very easy. 
Thanks for coming. Please leave us comments if any question regarding this Antergos Tutorial. 

How to install VLC Media Player on Antergos 2016

This tutorial is going to show you how to install VLC Media Player on Antergos 2016. As you might know, VLC is a simple, powerful multimedia player. VLC is available for Windows, Linux, Mac and also Android OS. Installing VLC on Antergos is very easy because its available through its repository.
install vlc on antergos 2016

Steps to install VLC on Antergos 2016

GUI Mode

Open Add/Remove Software from the App menu. Then type vlc on the search box and the result will be displayed. Mark VLC for installation and press Apply to start the installation.
Because VLC was buit with Qt technology, we need to make sure that Qt4 is installed on our system. Otherwise VLC will not start. So, install Qt4 if you don't have it on your system.

Text Mode

To install VLC Media Player on Antergos via Terminal, use the following command instead
sudo pacman -S vlc qt4
Once completed, you can start using VLC to watch your favorite movies or videos.

How to create Antergos 2016 Live USB from Windows OS

For Windows users that want to try the Antergos Linux, you can use your USB flash drive to create Antergos Live USB. With this Live USB, we can boot our computer without having to worry about existing file system. On this tutorial, I will show you how to create Antergos 2016 Live USB from a Windows machine. 

Requirements:
  • Antergos ISO
  • USB Flash Drive (4 GB or more)
  • Rufus for Windows
First, download Antergos 2016 ISO file and also Rufus application for Windows. We will use Rufus to create the Live USB.
Now, open Rufus application.

Step to create Antergos 2016 Live USB

Step 1. Select Device

On the top section, select your USB drive. At this point, you must plug your USB Flash disk to the USB port.

Step 2. Select Partition Scheme

Then, select "MBR Partition scheme for BIOS and UEFI" for the partition scheme. You can also choose another option but I recommend to use this one. 

Step 3. Select File System

By default, Rufus will set the file system to FAT32. Leave this as is. 

Step 4. Select Cluster size

Leave the cluster size with the default value unless you understand and need to change it. 

Step 5. Select ISO Image

Click the CDROM icon button to browse the Antergos 2016 ISO file you've downloaded on the previous step above. Optionally, you may check the Quick Format and Create Extended label and icon files if you want. 

Step 6. Start the process

Click Start to start the process. It will take few minutes. I highly recommend you to use the USB 3.0 flash drive because it significantly faster than any USB 2.0 devices.

Step 7. Reboot

Restart your computer and set the first boot to USB drive. Enjoy Antergos 2016 Live USB.  

Make your Antergos Desktop more eye catching with ArcTheme

Its always been a fun part to modify the look and feel of my Linux desktop. Now, its time to modify and make Antergos more beautiful and eye catching. There are many ways to do it, but for me installing new theme and icons are a good starting point.

Modification details:
  • Theme : Arc theme
  • Icons : Arc Icon Theme
Here is my Antergos Desktop with the above theme and icons


How to install Arc Theme on Antergos 2016

Open Add/Remove Software and then type arc-gtk-theme on the search box.
Mark arc-gtk-theme and arc-icon-theme on the list for installation. Next, open Settings | Appearance and activate the Arc theme.
Enjoy.

How to install Antergos 2016 Tutorial

As a new Antergos user, I want to share my experience when installing Antergos 2016 on my computer. In order to install Antergos, you must be connected to the internet. Cnchi software will update itself to the most recent version from the Official repository. Before we go through, you may want to check my Antergos 2016 Screenshots.

Steps to install Antergos 2016

Step 1. Open Antergos Installer

Go to App menu and click Install Antergos
Antergos 2016 installation
It will open the Antergos installer
antergos tutorial
Click Install to continue to the next installation step.

Step 2. Choose your Language

Select the available language from the list. 

Step 2. System Check Summary

At this point, it is better to fullfill all the Antergos requirements such as minimum hardware, internet connection etc.

Step 3. Select your location

You can see more countries by clicking Show All Location checkbox.

Step 4. Select Timezone

Step 5. Select the keyboard layout

If you don't know which one, I suggest to select English (US) from the list.

Step 6. Select your Desktop

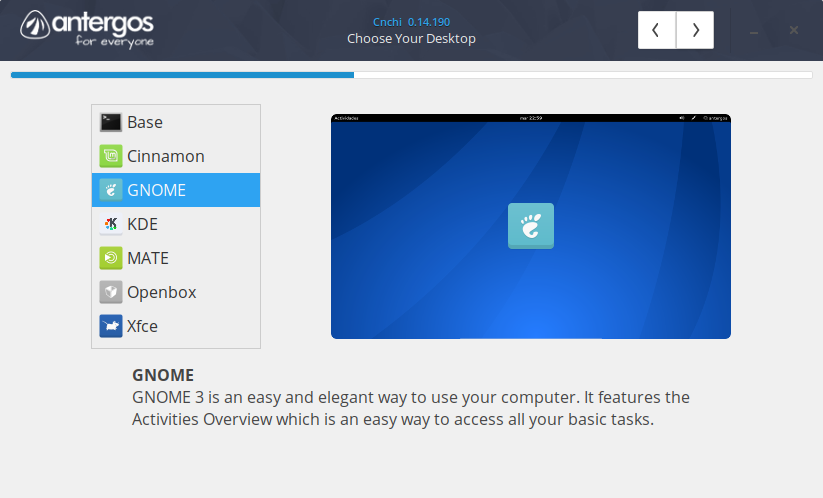
This is the interesting part. Antergos 2016 offers easy way to choose any available Desktop Environment during installation. You can choose from 6 different DE. Gnome, KDE, MATE, Cinnamon, Openbox and Xfce. Again, it needs internet connection to download some packages required by the DE to be correctly installed on Antergos.

Step 7. Additional Features selection

At this step you may add some other features or software available. I recommend to enable AUR and Flash Player from the list.

Step 8. Installation Type

This is the crucial step. Select the installation type from the list. The first option will use your hard disk for Antergos installation. The second one is the manual method.

Step 9. Select Hard Disk

You will need to specify which disk to be used. On this example, I will install Antergos to a flash disk, not hard drive. Select the drive for installation and also specify the boot loader installation.

Step 10. Installation Summary

You will see the installation summary displayed on screen.

Step 11. Create User account

You will need to create a new user account for Antergos system
The installation will start. Wait until it completed and then reboot your computer to the new Antergos Desktop. Please note that this process will take some times because it will download many files from the internet. 

Kategori

Kategori